Are you struggling to get your images just right for your website? This short tutorial will teach you how to quickly resize images in Canva, boosting your site’s performance, SEO, and enhancing visual appeal for a better user experience.
Why Resize Images in Canva?
In my experience as a web designer and SEO consultant, I’ve noticed a common challenge many clients face is needing help with image optimization for their website. In this guide you will see why I think the perfect tool for website owners who need to optimize and resize images easily and quickly is Canva.
If you are using a WordPress theme like the Divi Theme, you probably enjoy the creative freedom to edit your own website without needing any website development skills. However, you need to be able to easily resize, crop, and rename images for optimal web performance and SEO, not to mention to keep the overall design and layout intact.
Here, I’ll help you get started resizing images in Canva. Get ready to optimize images like a pro and give your website the boost it deserves.
Basics of Image Cropping and Resizing in Canva
Resizing and cropping are fundamental image editing skills. Resizing adjusts the image size without altering its aspect ratio, ensuring your images fit perfectly in the designated space on your webpage. Cropping, however, can change the focus of your images by removing unwanted elements and often changing the aspect ratio.
If you are using an image that was taken on your mobile device, by default it is most likely 5-10 times larger than it will ever display on a browser window. Resizing it down to the largest size that will actually be displayed on the browser will help you from having the page take forever to load an unnecessarily large image.
But sometimes an image is too wide or too tall (aspect ratio) for the space in the page layout. For example, let’s say the image in the original design is a square (500 x 500) but the image you want to replace it with is horizontal and the dimensions are something like 4598 x 2958. In this case, you could resize and crop it to make it a perfect square.
Quick Note About Canva Pro’s Magic Resize Tool
Canva Pro offers a special tool called Magic Resize which basically crops the image in various aspect ratios as well. It comes with several preset dimensions to choose from.
In this tutorial, we wont be using that tool. We will only be using the features that are currently available in the free version at the time this publication.
Let’s get started.
Resize Images in Canva: An Easy Step-By-Step Tutorial For Beginners
In the following step-by-step tutorial, we will create a blank canvas in the exact dimensions we want. Then we will place our image in there to crop it accordingly so that the image is the exact size you want. I also included some common website image size recommendations further down the article.
Create the New Canva Design
1. Login to www.canva.com
2. Click on Create a design

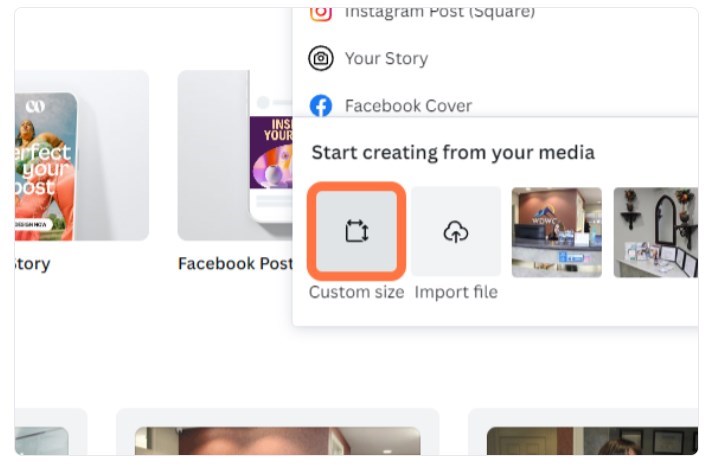
3. Click on Custom size
4. Add your custom width and height

5. Click on Create new design

Add Your Image and Resize It In Canva
6. Drag your photo from your desktop onto the Canvas

7. Drag corners to resize.
Hover over one of the corners or side buttons and you will be able to select it and drag it out until it fills the entire space.

You may need to zoom out a little in order to drag the image far enough outside of the cropped zone.

8. You can then move the image around until just the right part of the image is showing.

Save Your File (optional)
Let’s give it a name and save it to one your project folders. This step is optional but it comes in handy to keep an editable version in your Canva project folder in case you ever need to come back and change it.
9. Select the box in the upper right hand corner in order to name the file.

10. Select File and Save To Folder

11. Save it to your project folder of choice or create a new project name.

Download Your File
Now that you saved it to your Canva Project Folder, you can download it to your computer so that you can upload it to your website.
12. Select Share and Download

13.Choose your format
I like to use JPG for most standard pictures since the file sizes is typically smaller. PNG files are best for complex images, illustrations, and/or anything that needs a transparent background.

14. Select Download and save it to your computer

And that’s it my friends. Easy-Peezy!
Common Image Sizes and Limitations for Websites
Here’s a basic table covering common image sizes and limitations for websites:
| Purpose | Ideal Image Dimensions (px) | Maximum File Size |
|---|---|---|
| Full-Width Slider | 1920 x 1080 | 500 KB |
| Half-Screen Slider | 960 x 1080 | 300 KB |
| Thumbnail Image | 150 x 150 | 100 KB |
| Blog Post Featured Image | 1200 x 630 | 200 KB |
| Background Image | 1920 x 1080 | 500 KB |
| Social Media Share | 1200 x 628 | 300 KB |
| Logo | 250 x 150 | 100 KB |
| Icon | 64 x 64 | 50 KB |
Please note that the specific image dimensions and file size limitations can vary depending on your website’s design and your specific needs. The goal is to have the image quality as high as necessary while keeping the file size as low as possible to maintain optimal website performance.
Why All Business Owners Should Consider Utilizing Canva
As a leading Divi Expert in the USA, I have spent years building engaging websites for a wide variety of businesses and agencies. While I frequently optimize images and create custom graphics, I lack the time to master feature-rich software programs such as Adobe Photoshop and Adobe Illustrator.
I needed a tool that allowed me to easily create graphics for websites, social media, newsletters, blogs, flyers, and other misc. tasks. This tool transformed the way I handled image editing tasks for every project I work on, including when working with large teams that are spread out across the globe.
Not only has it helped me effectively resize and crop images, but it also enabled me to create stunning visuals without needing advanced graphic design software skills. Now, I use Canva for all my projects, and I’m thrilled to share the knowledge I’ve accumulated with fellow website owners like you.
Geno Quiroz serves on the Marketing & Technology team at IPX1031, a Fidelity National Financial company and a national leader in 1031 tax-deferred exchange services. In his current role, Geno focuses on website architecture, design, development, SEO/AIO, and digital marketing strategy. His work helps strengthen the company’s digital presence, improve user experience, and ensure that IPX1031’s online platforms effectively support client engagement and long-term growth.
Concurrently, Geno continues to lead Monterey Premier, the web design and strategic consulting firm he founded in 2015. Through Monterey Premier, he partners with entrepreneurs, nonprofits, and growing organizations to design high-performance websites, refine digital sales funnels, and implement conversion-focused strategies.
His hands-on experience building and scaling a client-facing agency has provided him with a real-world understanding of growth strategy, brand positioning, and the operational realities of business ownership — experience that now directly informs and strengthens his work in enterprise marketing technology.